Application Demo Center
The Application Demo Center is a tool that will allow simplistic dashboards and or demos to be created quickly and easily to help showcase the power of blockchain authenticated document automation. After using this guide, demos to showcase the interoperability, automation, computation, and overall power of smart documents to any prospective client/collaborator will be an easy feat to accomplish!
Overview
The Application Demo Center will make the creation of demos, showcasing the power and automation, of Smart Documents quick and easy. Using this tool, along with the Simple Smart Document Creation and Document Set Creator tools, simple, yet powerful completely customized demonstrations of the computability and automation of these Smart Documents can be created in minutes. These demos are meant to help bring understanding to potential partners or collaborators who have never been exposed to blockchain authenticated Smart Documents.
In order to get started, a document set, or a single document, is needed to move to the next section of creating a demo. The next section will have detailed instructions for creating a Smart Document Application Demo.
How to Create an Application Demo
The first step in creating a Smart Document Application Demo is navigating to the site, which can be found below in the Live URL section.
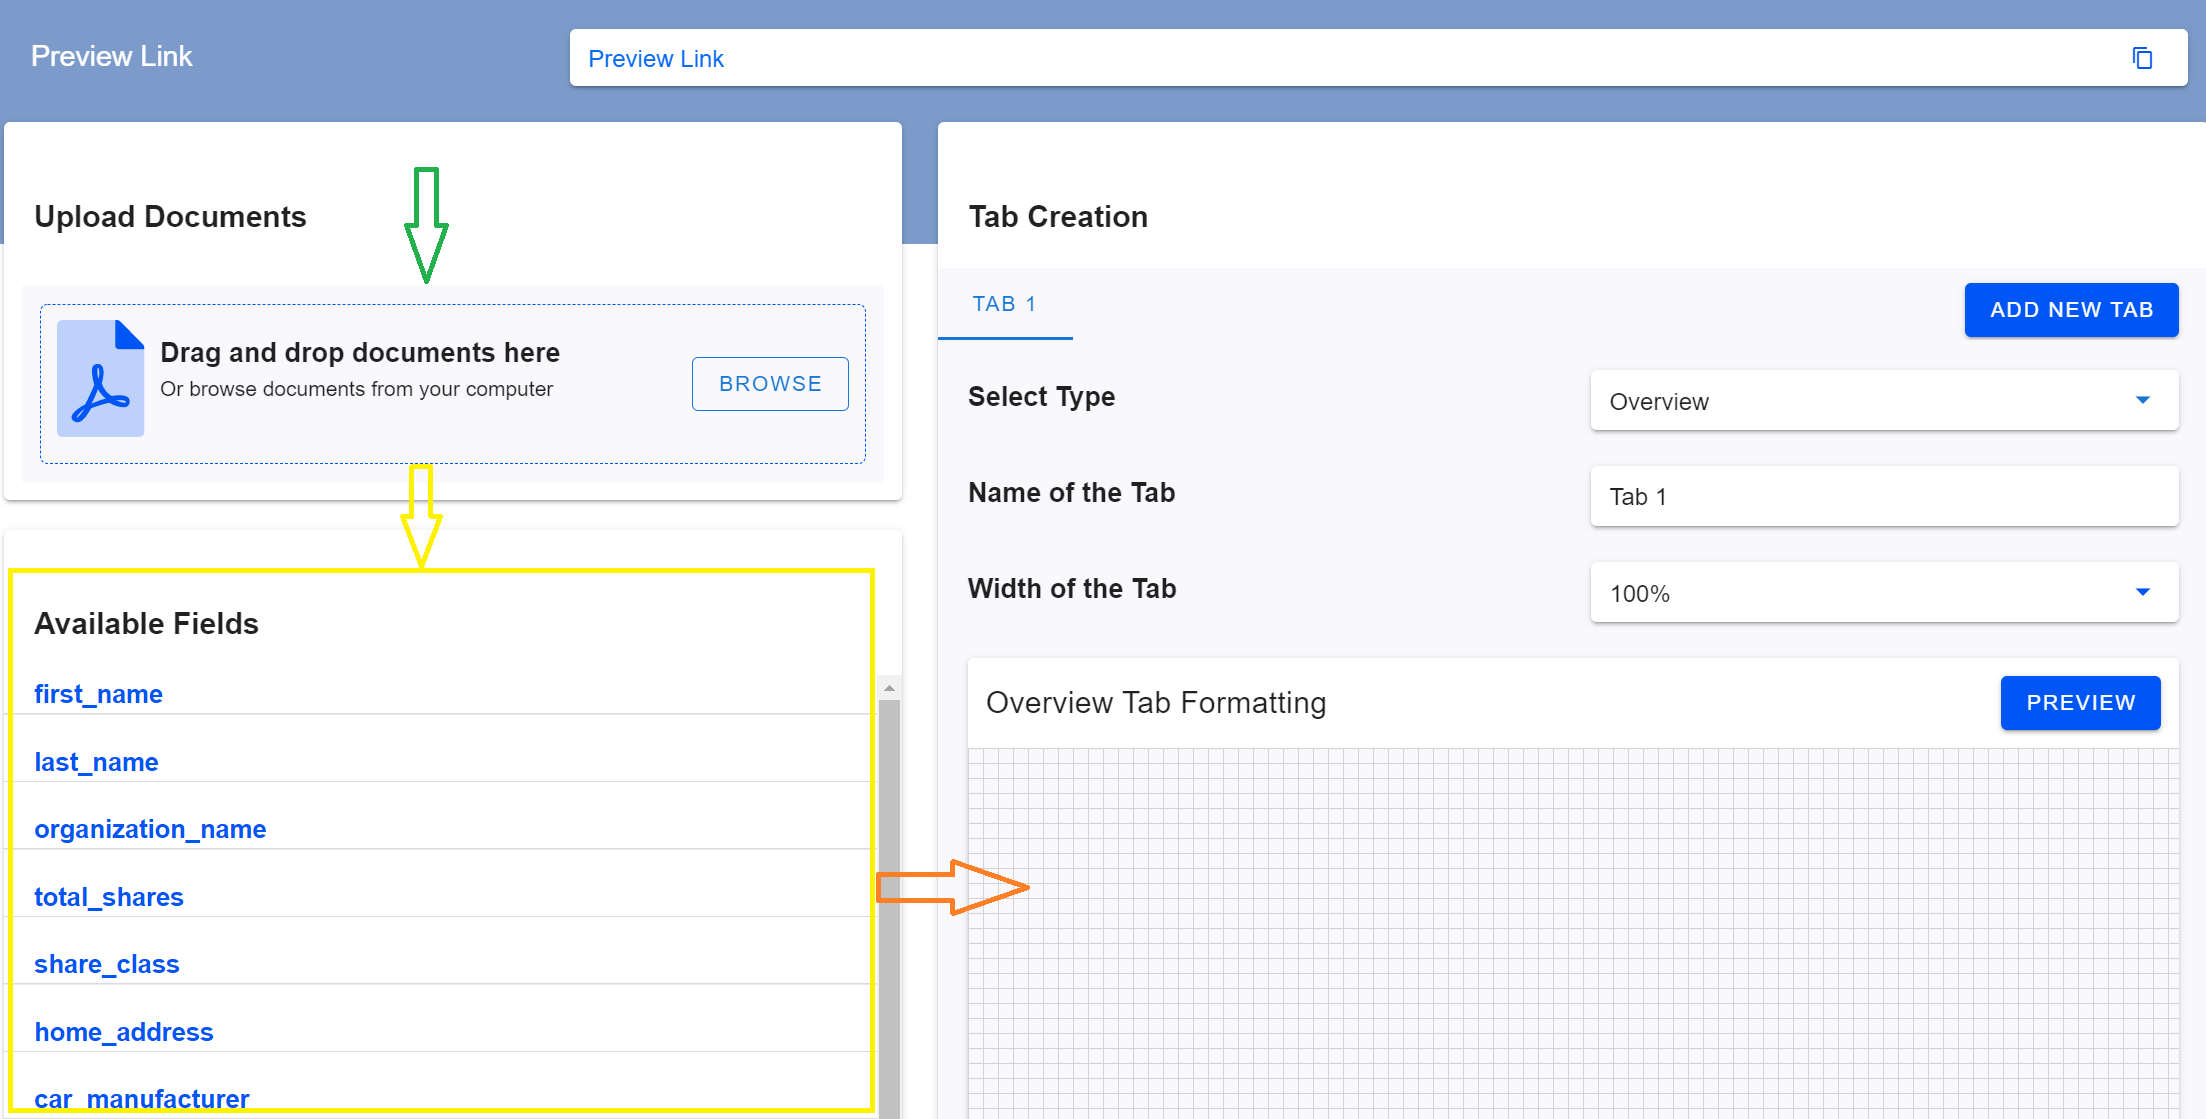
Next, drag and drop all of the Smart Documents that are going to be used to build and or create the report. Only Integra Smart Documents are going to work for the next step of creating the demo. Figure 1, the green arrow, shows the area to drag and drop the documents. The easiest way to make this happen is to drag and drop the entire folder of documents onto the Application Demo Center all at once. The Application Demo Center will check every document to ensure the hash is registered on the blockchain, and once verified it will generate a complete list of all the fields in all the documents which will show up in the left-hand column, as displayed in Figure 1 with the yellow arrows.

Figure 1: How to get an application demo started. First, drag and drop the document set, fields are then populated. Drag these fields into the "Tab Formatting" area.
These "Available Fields" are a comprehensive list of all fields from all documents that were dragged onto the page above. All the fields can be dragged to the right onto the "Tab Formatting" area for placement on the Overview or onto a specific value for the other tabs. Note that the fields in there are two types of fields in the "Available Fields" area, ones that are arrays (there are multiple files that contain this variable) which appear in bold and blue and ones that contain only a single value which is just blue. This is important for information about the various types of tabs shown in Table 1. Now that we have covered how to get fields from documents and onto tabs, it is time to cover the various tabs and inputs they will be expecting along with end result functionality.
| Tab Name | Tab Inputs | Tab Result |
|---|---|---|
| Overview | Any field. Single values work best in this tab. Snap to grid ability for each field for precision design. Double click on each item to set the display item, which will show up to the left of the value pulled from the document. | The overview tab is great for pulling information about a company or organization and details associated with the entity. |
| PieChart | Label and Value. These should be array values where the value should be either a number, currency or percent. | The pie chart tab will create a pie chart based on the values that are passed. The label will show the number that is passed in on the graph. |
| LineChart | Label and Value. These should be array values where the values should be either a number, currency or percent. | The line chart tab will create a line chart based on the values that are passed. The label value works very well as a date for the line chart. |
| BarChart | Label and Value. These should be array values where the values should be either a number, currency or percent. | The bar chart will create a bar chart based on the values passed. The label will represent the bar height for the value. |
| DataSheet | Each "New Field" created requires a label (which is typed in) and an Expression. The expression may contain several fields from the "Available Fields" with numeric operators. | The datasheet will produce a spreadsheet with the calculations that were used in the expressions. Ensure to use the "Preview" button to ensure accurate results. |
| Map | Label and Address. The label field will show on the map for the corresponding address that is pulled from the document. | The map tab will generate a map with the locations that are pulled from the information contained within the source documents. |
| FolderFiling | Reference field, the field where documents are filed based upon. Create new folders based on the reference fields for documents to go into the various folders. | The folder filing tab will generate an explorer/finder like feel where documents are moved into these folders based on the value pulled from the source documents. |
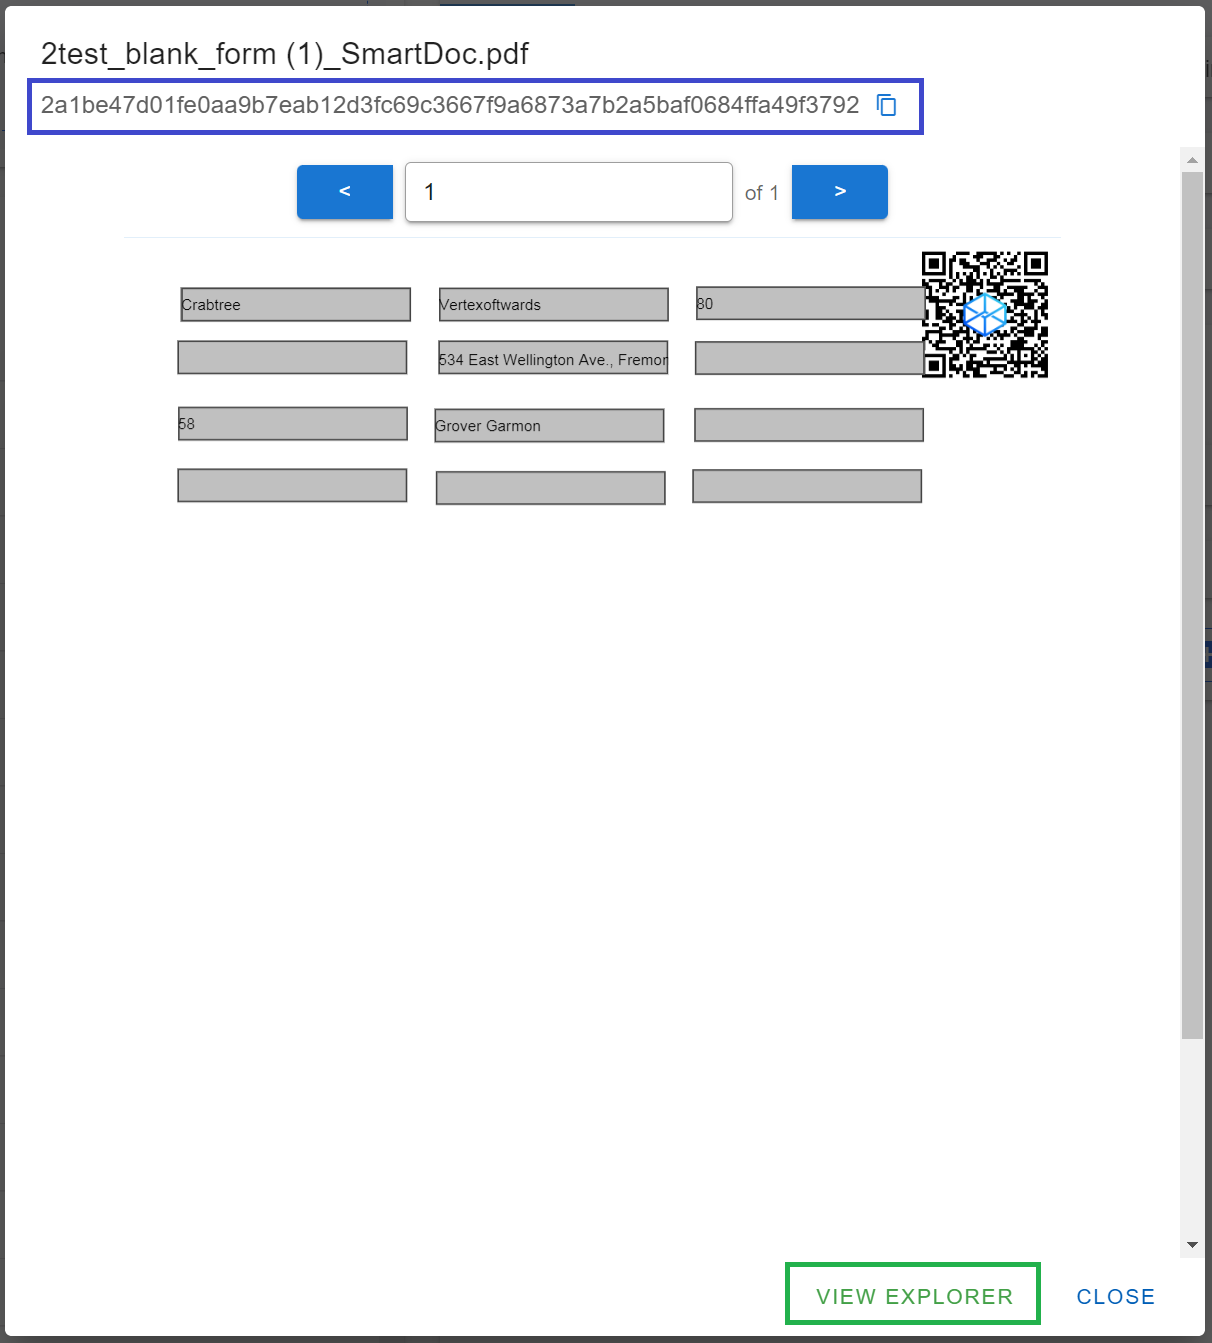
The Folder Filer Preview is a very unique tab. This tab not only shows document sorting but also allows the ability to click on one of the files. When the file is clicked on the Application Demo will not only display the file, but above the file, it will show the hash of the document. At the bottom of the modal window, if the button "View Explorer" is clicked, the actual transaction on the blockchain will be linked to on Blockchain Explorer. Figure 2 shows the folder filer window with the blue box showing the hash of the file and the green box showing the link for view in Blockchain Exlporer.

Figure 2: Folder Filing dialog window when a file that is filed is clicked upon. The blue box is the current hash of the file and the green box is the button to view the transaction on the blockchain explorer.
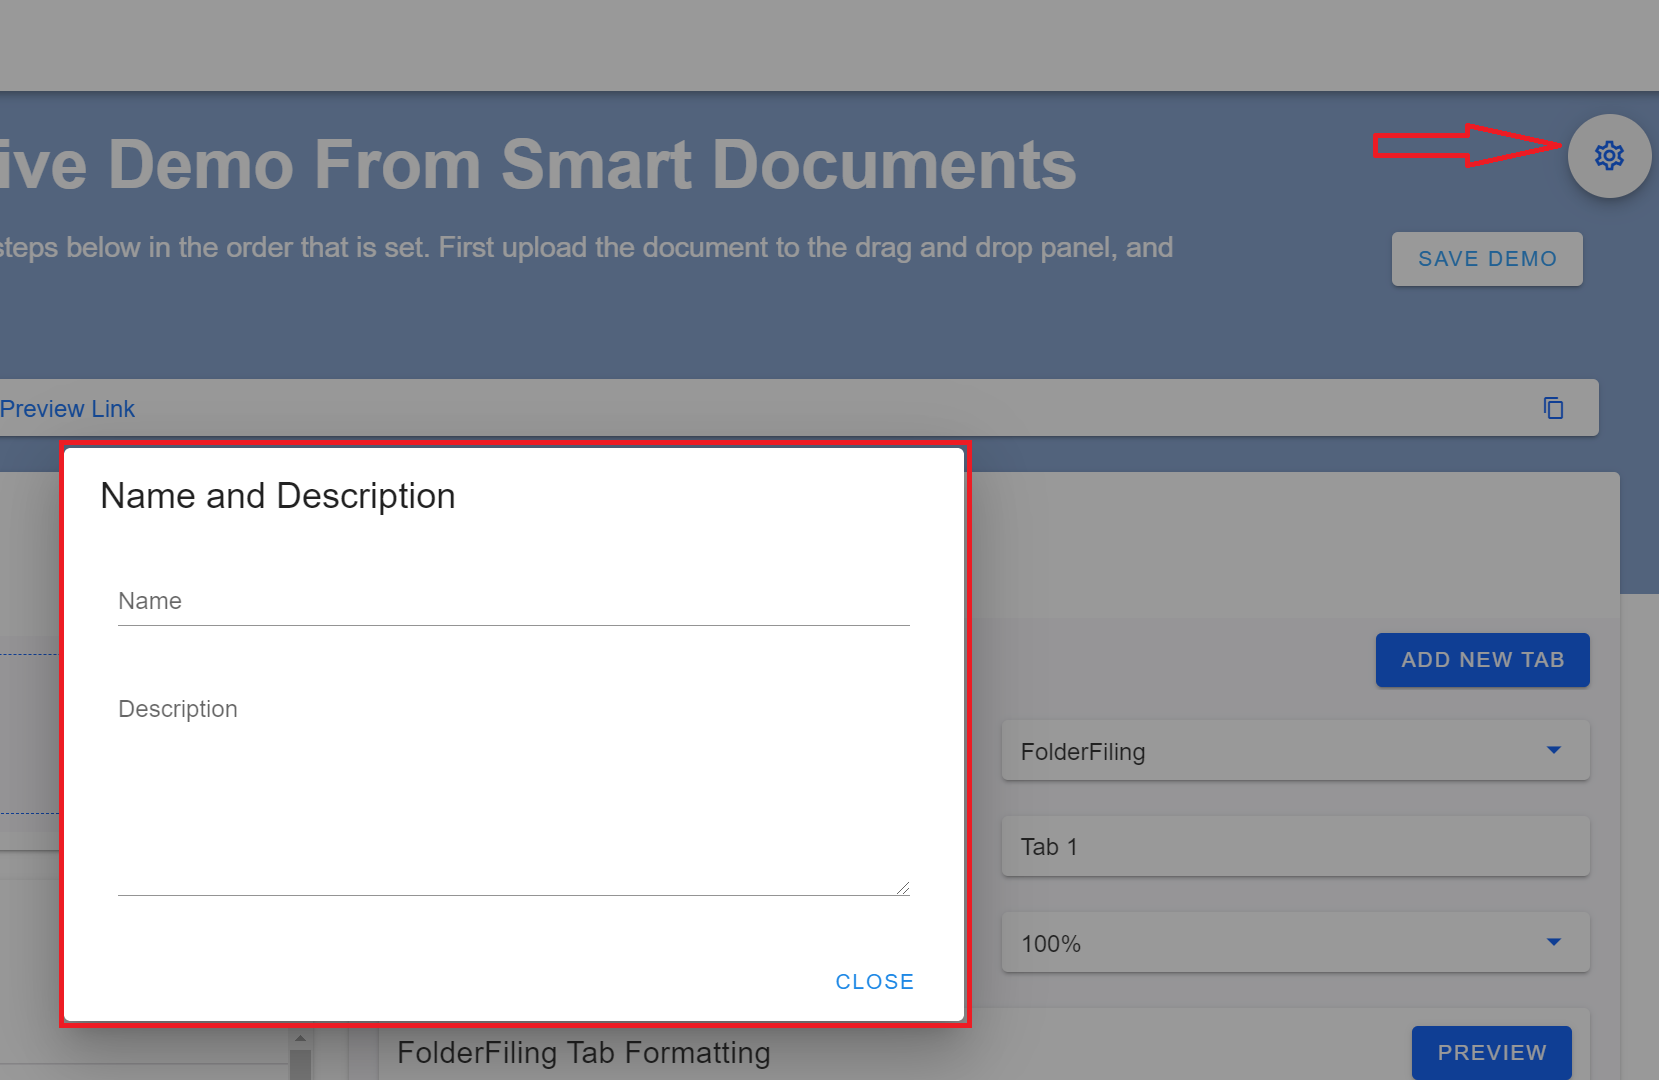
After all the tabs are added for the demo, there are two additional items that need to be covered before the demo is ready for sending to collaborators. The first item is the Settings icon. This icon can be found in the upper right-hand corner of the window. The settings icon will allow a name and description to be added to the demo application. These will help the intended recipient get a better understanding of what the demo is actually trying to demonstrate. In addition, if the name and description are not set prior to clicking on the "Save Demo" button, it will prompt the user to enter the name and description before continuing on to complete the application demo. Figure 3 shows the Settings button and the dialog for setting these values.

Figure 3: Settings buttons for setting the name and description for an application demo.
Once the application demo has been successfully saved, the preview link will be occupied with a URL for the application demo that was just created. There is a copy button that is to the right of the URL that will allow the link to be copied to send to intended recipients along with the document set that was used to create the demo.
Ensure Proper Testing of the Application Demo
Before sending any demo out for testing to any prospective client or collaborator, ensure that end-to-end testing is completed and the application demo actually displayed what should be displayed or conveyed to the collaborator. Changes to the application demo can easily and simply be made by making modifications and clicking "Save Demo" again to get a new Preview URL.
Every preview URL will have an initial screen where the viewer of the link will need to drag and drop the document set as the initial step. Once the document set is dragged and dropped onto the screen, the results will be displayed, which should look similar to figure 4.
Figure 4: Example result of an application demo that was created in this guide.
Key Takeaways
Data Stored in Documents
The Application Demos are the most powerful tool to show how documents are the next generation databases by using blockchain authentication to ensure they are authentic. Once documents are confirmed as authentic, the information within them can be trusted as unaltered. Unlike traditional centralized database systems, the new paradigm of information traveling along with documents will unleash an entirely new range of applications and functions using the distributed nature of blockchain.
Computations Data
The power of being able to compute data from multiple documents and also ensuring the set of data is complete is invaluable. Data about documents within an organization proves to be extremely useful but the same can not be said once the document leaves that said organization. To have this data move along with documents and to ensure that the documents about a certain entity are complete in a public means is revolutionary. Allowing data about an entity to be computed based on the documents that support it, such as bills or leases, will change how valuations are calculated in a matter of seconds versus the current means which takes weeks or months.
Easiest to Demonstrate New Technology
There is no way to better demonstrate the new concept of blockchain authenticated documents than showing how they can create computational data, graphs, and maps by simply dragging the documents that are already being used for various entities. Leases, bills, and other documents regarding entities are already associated and being used in a standard format but if these documents can do more than be stored but actually show or represent value than a whole new paradigm has been created.
Live URL
Updated over 2 years ago
